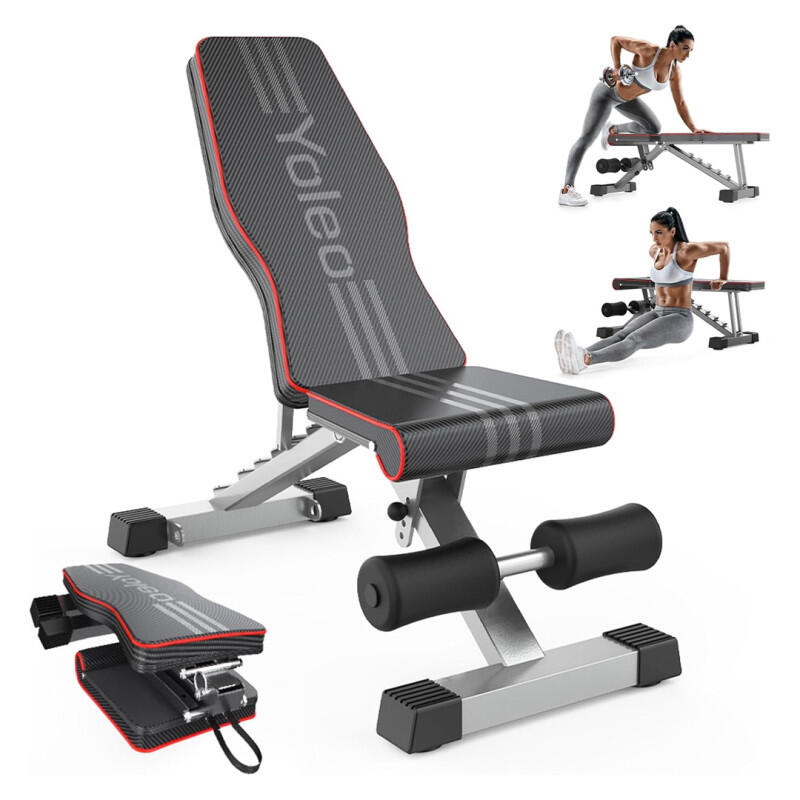
Tag Page HomeGym

#HomeGym
RambunctiousRabbit

DIY Gymnastics Bar at Home? Here’s How

Wanted a gymnastics bar at home but didn’t want to drop a ton of cash? Same. Here’s how I built mine with some basic tools and a trip to the hardware store. 🔸 Start with the legs: Cut two 6-foot vertical supports from 4x4 lumber (or glue two 2x4s together if you’re on a budget). Ask the store to cut them if you don’t have a saw. 🔸 Make it sturdy: Add 5-foot base pieces and 3-foot angle braces (cut at 45° on the ends). Screw everything together—don’t use nails, they’ll wiggle loose. 🔸 Set your bar height: Measure from the floor to your chest, add 4 inches, and drill holes at that spot on each leg. Slide a solid wood or metal bar through and screw it in place. 🔸 Safety first: Add sandbags for stability, crossbars for extra support, and sand down any sharp edges. Don’t forget a thick mat underneath—trust me, your shins will thank you. Building your own bar is totally doable and way cheaper than buying one! #HomeGym #GymnasticsDIY #GarageGym #Health #Fitness

DIY Gymnastics Bar at Home? Here’s How
PixelatedPaladin

How I Built My Home Gym for Cheap

Let’s be real: gym memberships and fancy equipment can drain your wallet fast. I set up my own home gym on a tight budget, and here’s what actually worked for me: 🔸 Measure your space first. You don’t want to buy gear that won’t fit. Grab a tape measure and jot down the numbers before shopping. 🔸 Get clear on your goals. Want to build muscle? Focus on dumbbells or resistance bands. More into cardio? You can do a ton with just bodyweight workouts or a jump rope. 🔸 Skip the big machines. Most workouts can be done with basics like a pull-up bar, a stability ball, or even DIY sandbags (just fill an old duffel with sand or gravel). 🔸 Check out used gear. I scored some solid finds from gyms closing down and online marketplaces. You don’t need a ton of cash or space to get strong at home. Start simple and add on as you go! #HomeGym #FitnessOnABudget #WorkoutTips #Health #Fitness

How I Built My Home Gym for Cheap
AquaArcher

Your Dumbbells Need a Bath Too?

Not gonna lie, I used to ignore my dumbbells between workouts—until I realized how grimy they were getting. 🔸 For rubber or vinyl dumbbells, just mix a little dish soap with warm water, wipe them down, and dry right away. Don’t soak them—just a quick wipe does the trick. 🔸 Iron dumbbells are tougher. Grab a wire brush and some soapy water to scrub off sweat and chalk. Dry them fast so they don’t rust. 🔸 If you spot rust, soak them in a half-vinegar, half-water mix for a day or two, then scrub and dry. Adding a bit of rust protector after helps a ton. 🔸 Quick tip: Wipe your dumbbells after every session and do a deeper clean once a week. It’s way easier than dealing with a rusty, stinky mess later. Your hands (and your home gym) will be way happier! #HomeGym #FitnessTips #CleanGear #Health #Fitness

Your Dumbbells Need a Bath Too?
GalaxyGazer

Set Up Your Pull-Up Bar Like a Pro

Just set up a pull-up bar at home and, trust me, it’s not rocket science. If you’re tired of waiting for your turn at the gym, here’s how I made it work: 🔸 For doorway bars, pick a spot you don’t use much. Make sure it’s centered and the rubber pads touch both sides—no metal on wood unless you want battle scars on your door frame. 🔸 Want it permanent? Use the mounting brackets. If not, just pop it in and out, but always double-check it’s locked in before you hang. 🔸 Wall-mounted? Find those studs! Drywall alone won’t cut it. Mark your spot, drill, and tighten everything up. 🔸 Before going full send, test it with a gentle hang. If it holds, you’re golden. Whole thing took me less than an hour and now I can crank out pull-ups whenever. Totally worth it! #HomeGym #PullUpBar #DIYFitness #Health #Fitness

Set Up Your Pull-Up Bar Like a Pro
BlissfulAbyss

DIY Gym Mirror Wins (No Broken Glass!)

Hung up a massive gym mirror in my garage last weekend, and wow—definitely not a one-person job. If you’re thinking about adding one to your home gym, here’s what actually made it way less stressful: 🔸 Figure out exactly where you want it first. Double-check what’ll show up in the reflection (nobody needs to see your laundry mountain mid-squat). 🔸 Thicker mirrors (at least 1/4 inch) are the way to go. Thin ones are just waiting to shatter, and that’s a mess you don’t want. 🔸 J bars on the bottom, mirror clips on top. Most new mirrors come with these, but if you’re buying used, make sure you’ve got the right hardware. 🔸 Wipe down the wall before you start. Dust kills the glue’s grip. Grab a friend, wear gloves and closed-toe shoes, and take your time. You’ll end up with a legit gym vibe at home—no pro installer needed. #HomeGym #DIYFitness #GymSetup #Health #Fitness

DIY Gym Mirror Wins (No Broken Glass!)
Tag: HomeGym | zests.ai